SOLAR PANELS F.A.Q.
PLANNING THE PURCHASE
WHAT TYPE OF SOLAR PANEL DO I NEED?
SUNBEAMsystem manufactures high efficient, high-quality solar panels for vehicles and boats.
On any type of vehicle, you would normally prefer a small, lightweight, and thin solar panel that produces a lot of energy.
Our big range of models will ensure that you can choose a panel that will suit your needs. Generally, our panels produce more energy per available space than others which is important when you only have small areas available.
With our range of Flush models, you avoid the need to have a junction box. With these models, you have an absolutely flat surface without any protruding parts. If you can run the cable through the surface, then the installation will be virtually connectionless. If you need to run the cable some distance, you might glue the cable along the surface and it will be almost invisible.
Our Tough model range offers outstanding longevity compared to other lightweight solar panels.
The combination of Tough and Flush is the most popular version of panels.
FIND A SUITABLE PLACE FOR THE PANELS
No matter if it is your first solar panel or if you need more, the available space is of the essence. If you have a boat we would like to remind you that you can walk on our panels, this might open up some extra available space. If you have an RV with a full roof, you could consider the sides. We do also offer special models for canvas to be used on a boat or for example a tent used together with an RV.
You could benefit from using several smaller panels to fill up available spaces. One panel on each side of an obstruction is often much better compared to one panel. If you often experience shadows covering the area meant for solar panels you might benefit from choosing two panels instead of one. Two panels can be connected to the same regulator.
For odd surfaces with a big difference in solar angle and shadowing one could benefit from using one regulator per group of panels for the different surfaces (when using MPPT regulators).
Most of our solar panels are designed to be permanently glued or screwed to a firm surface. If you plan for any type of semi-permanent or temporary usage then choose Tough Fold, Quick Fix, or the Carbon models. A solar panel intended for permanent fitting will get a shorter lifespan if not used as intended and it might void the warranty.
DOES THE ANGLE MATTER?
No matter what brand of solar panels you choose, simple physics will lower the production when the panel is not angled towards the sun. If you live in the northern hemisphere, you might for example find yourself in the situation where the sun is 45 degrees over the horizon on the south.
If you then instantly compare a solar panel lying flat on the ground with a solar panel directed towards the sun you will notice more than 30% drop in production.
This will trigger even the least competitive person. But please stay calm, we would like to share some further knowledge. IF you would measure on the two panels mentioned above over an entire day you would only get an 11% drop in the total production for the panel lying flat on the ground compared with the panel angled 45 degrees towards the south. This is because of the sun’s movement over the day.
This is GREAT NEWS for all of us planning to put solar panels on moving boats and vehicles. One can safely attach solar panels on top of the vehicle or boat. The most practical and safe solution is still almost as good energy-wise as any of the more inconvenient mounting solutions.
Of course, the most efficient solution would be a solar tracking system, this is often found at solar power plants. A tracking system is usually expensive. If you plan to fit the solar panel on a pole and manually adjust it, please consider that this would mean that you have to set the alarm and every hour from dusk to dawn adjust the panel manually. This if you want to get the benefits from tracking the sun. If you find this complicated you will then have to choose between leaving it horizontally or slightly angled towards the south (as long as the boat is not moving). The Pole has then mostly lost its purpose except for possibly be kept away from some shadows.
At SUNBEAMsystem we truly believe that solar panels should be something you install and then forget. The best solution for your energy problems but also the least troubles. Hence we only build lightweight panels built to be fitted on a firm surface. Our panels are not built to be fitted on a pole, but we do offer the QuickFix model and the Sunzip upgrade for the same. This will allow you to fit solar panels on top of any type of Canvas like a tent, bimini, or sprayhood/dodger. The fittings are semi-permanent and will only come loose when you want to.
HOW MUCH WILL A SOLAR PANEL PRODUCE IN BAD WEATHER?
This is hard to give a precise answer but generally one can say that as long as you can feel the sun’s heat on your skin through the clouds you will get energy from your solar panels. If the clouds are grey/blue and you do not feel any heat the energy produced will be minimal.
SUNBEAMsystem solar panels have won multiple tests in comparison to production in non-laboratory weather conditions.
A SIMPLE METHOD TO CALCULATE SOLAR PANEL SIZING
The physical space available, as well as the energy consumption measured over 24h, are the two most important factors when choosing the size or amount of panels needed.
The simplest kind of sizing is to try and even out the single biggest electricity consumer. This is very often the fridge. By using this method you would in general need some 60W solar panel (or panels). But it could of course vary between 30-100W depending on the type of fridge, age, insulation, and climate.
The Fridge is usually one of the biggest consumers on a yacht or RV. If you have other energy consumers and would like to be totally independent of other means of charging you would of course need even more solar panels. But bear in mind that any solar panel will help a lot and prolong the times needed between charges.
If you need the most energy out of a small available space you should choose a SUNBEAMsystem solar panel.
DOES THE SIZE OF THE BATTERIES MATTER?
The size of a battery is measured in Ah (Ampere hours). To know how many Ah your battery bank can store you should add the Ah for each individual battery. You could look at it as the size of the water tank.
When you empty or fill your tank you measure the A (Ampere) going in or out.
When choosing solar panels no special considerations need to be taken in relation to the size of your battery bank. The panels should rather be sized in relation to the amount of energy used over a 24 hour period. (You might read more regarding this further down).
The battery type might still matter and could affect the type of regulator, read further down regarding regulators.
ADVANCED: SOLAR PANEL SIZING
In general, we could say that most users will increase their energy consumption a little bit every year. It might be good to plan ahead for some extra solar panels in the future or go for extra solar panels or the bigger size right away.
To make an exact calculation of the need, you have to know your energy consumption over 24h. You could use measuring instruments or you could find the data on the products you use. Another way is to look at the size of your battery bank and how much you use. For example, if you have a 100Ah bank and you know that you use 20% over 24h then you could assume your need is 20Ah per 24h.
To calculate the consumption from data you need to know the consumption and the time. Example Fridge 1.9A and lights 0.3A. Lights might be used for 3 hours and the fridge for 18 hours. The total amount of used Ah, 1.9×18 + 0.3×3= 35.1 Ah
To calculate the number of solar panels needed we would need to know how many sun hours we have on average. We could also enter a factor to take into account low solar angles during late and early hours. Up north in Sweden (the origin of SUNBEAMsystem) we would do 0.7x sun hours on mid-day and something like 0.5 x sun hours early and late. On a sunny day, we would then have 0.7×3 + 0.5×6 = 5.1 hours
We would then take 35.1 Ah and divide by 5.1 hours which equals 6.8 A
Then use 13volt to multiply by 6.8A and we get 88.4 Watt which corresponds to our minimum need of solar panels. (of course, a 44Watt solar panels would double the time between needed recharges by other means)
SOLAR SYSTEM INSTALLATION
CONNECT THE SOLAR PANEL AND CONTROLLER
In moist environments like a yacht or RV, one should always use pre-tinned cables for the best performance over time. These are recognized by the silver-colored threads instead of the copper color.
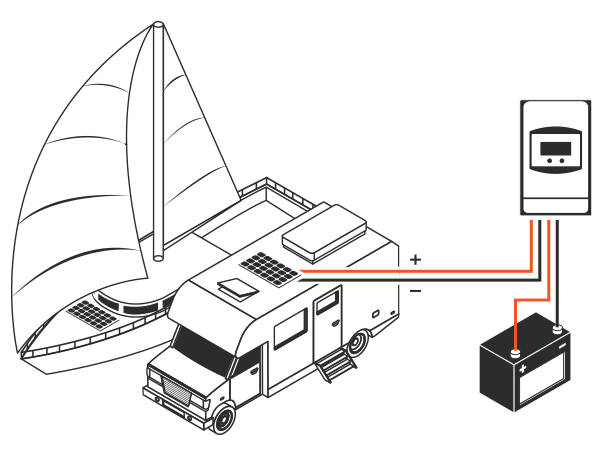
First, connect the regulator to the service battery as illustrated below. By doing this a regulator with autosensing will recognize the battery system.
Second, connect the solar panel. In almost every case a long cable will have to be used and a connection between this cable and the solar panel cable needs to be made.
If you have a detachable solar panel you will most probably have MC4 waterproof connectors on this one and you should put compatible MC4 connectors on the end of the cable from the regulator. The metallic part in the MC4 connector needs to be soldered to the wire and then put inside the plastic part with an audible click. Then screw the cap on firmly to achieve total waterproofness. Please note that just squeezing instead of soldering might cause a defective connection and in the worst case fire due to heat.
For Flush model panels that do not have any connectors, you need to run the cable inside and here connect it by your favorite connection type. Please remember that how simple and convenient your usual connection is – soldering is superior to all other methods.
Choose thick (big cross-area) cables to avoid losses. Use our calculator to find a suitable cable cross area.
A small percentage of losses are acceptable in the cable running from the solar panel to the regulator. Between the regulator and battery, you would like the voltage drop to be zero. Hence it is important to place the regulator close to the batteries or main cables.
Note that in the diagram the “load†port is not used. This is an extra feature that can be used with a timer that is set in relation to sunrise and set.
PLANNING MULTIPLE SOLAR PANELS
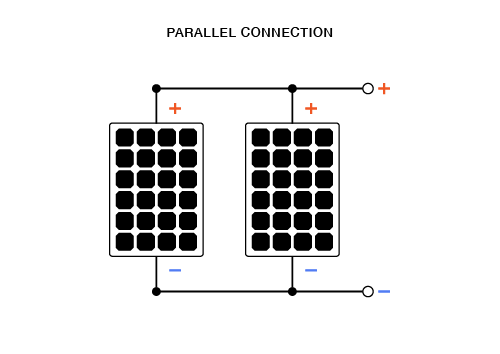
PARALLEL CONNECTIONS
Any SUNBEAMsystem panels can be put in parallel with other SUNBEAMsystem panels without extra considerations. For the best result use models with similar Vmp (found on the back)
Connection in Parallel is the preferred installation type when using SUNBEAMsystem solar panels. It will give the best performance overall as well as a sturdy system.
As wattage and distance to regulators increase the cross area of the main cables running from the solar panels to the regulators needs to be increasingly bigger to avoid losses in the cables.
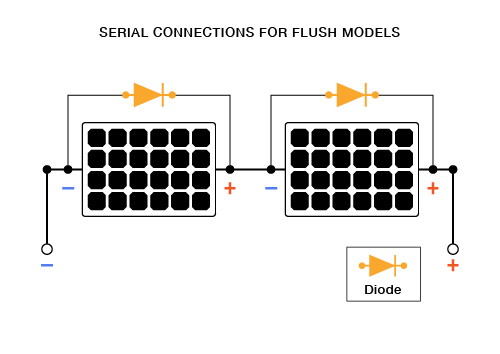
SERIAL CONNECTIONS
Please observe that to achieve the best performance we do recommend a connection in parallel according to above.
SUNBEAMsystem solar panels can be put in series. However, we do recommend a connection in parallel for the best performance and longevity. If a serial connection is unavoidable the recommendation is to use a max of 2 to 3 panels in series. This info varies per model and is given by the max system voltage. The maximum will always depend on the MPPT-regulator as well. By-pass diodes according to the picture are ALWAYS required on Flush models. On JBox models there is a by-pass diode built into the box.
For 24V or 48V systems we do recommend the use of a Genasun Boost controller to be able to avoid the connection of solar panels in series.
Before putting panels in series, please consider the pros and cons of this solution.
Pros:
Higher voltage on the solar panel cable backbone.
Cons:
- A Constant small power loss in the by-pass diode not normally experienced on the diode-less Flush models.
- The diodes will increase partial shading performance but serially connected panels will still produce less in most shading conditions compared to parallel connected panels. The result is most often less total performance over time.
- The solar panels well being is dependent on a single point of failure (a by-pass diode). If this fails or is installed in an incorrect manner it might shorten the life expectancy of all of the solar panels in the connected series.
SERIAL CONNECTIONS FOR FLUSH MODELS
To achieve a secure installation as well as the best performance in shading conditions a by-pass diode is needed for every single panel.
NOTE: Incorrect diodes can damage your panels. Our retailers will provide the right-sized diodes needed for your installation upon request.
NOTE: Incorrect polarity on the diodes or a distant installation of the diodes might damage your panels.
SOLAR PANEL ARRAYS CONSISTING OF COMBINATIONS OF PARALLEL AND SERIAL CONNECTIONS
For large arrays, a combination of Serial and parallel connections will have to be used to find the right combination of voltage and high amounts of panels.
- The maximum number of panels in series varies with the model.
- The number of parallel groups is limited by the regulator maximum.
- The same pros and cons as earlier described regarding parallel vs. serial connections apply here as well.
- Use a balanced symmetrical setup.
- Main cables should have a sufficient cross area.
- The Same size and model solar panel should be used.
- One by-pass diode needs to be installed per each panel (JBox models already got this).
- For each serial group, one fuse should be present. The fuse rating should be according to Ioc printed on the backside of one of the panels multiplied with 1.25. (example, 6×1.25=7.5, then choose 8A fuses).
The Fuses replaces blocking diodes traditionally used. The choice of fuses will improve the production compared to using blocking diodes.
JBox panels use MC4 connectors and have got the by-pass diode inside the box. This makes connection easy. Simply connect plus to minus on the panels in series and use MC4 connectors or MC4-T connectors for the backbone.
Flush panels (flat hidden cable) need to have the cables run inside for connecting Diodes and connection to the cable backbone. Remember that the cable can be glued along a white plastic surface with an almost invisible result.
The direction of the diodes is crucial so please take extra care when connecting. The direction of the printed band should be the same as the band in front of the arrow in the diode symbol. When only indicated with plus and minus it should be connected in reverse to the polarity of the solar panel. Study the pictures below carefully.
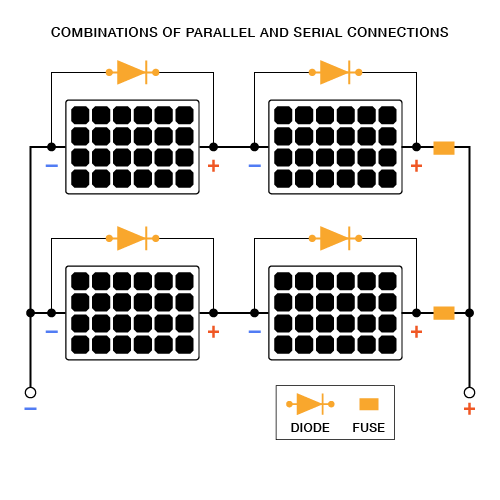
Above is an example of 2P2S (two in parallell with 2 in series)
DIODES

NOTE: Incorrect diodes can damage your panels. Our retailers will provide the right-sized diodes needed for your installation upon request.
MULTIPLE ARRAYS
If a high expected consumption has to be met with a large solar panel array then one should follow some simple advice. In an environment with different main directions or reoccurring shading conditions (like a yacht), one could benefit from having several arrays with one MPPT regulator each. For example, one starboard and one port array
Follow this link to find further examples when installing on a 50-60V battery system
This might also be the only solution when many panels are needed but the regulator max rating would have limited the number of panels.
Choose the same brands and models for the regulators. One regulator per array.
The same rules and recommendations mentioned above for single arrays apply here.

SOLAR CHARGE CONTROLLERS F.A.Q.
CHOSE THE TYPE OF CONTROLLER: STANDARD OR MPPT
A simple controller might be a cost-effective solution. An MPPT regulator may be more costly but will render more energy from any type of solar panel. Theoretical calculations might give up to 30-35% more than a simple regulator. In real life, one should count on between 0-20% increases in production. The result depends on the conditions.
So how to choose? Let’s say you would get 10% more production out of your solar panel with an MPPT controller. Then you might compare the cost for 10% bigger solar panels versus the more expensive MPPT regulator. IF you have limited space we would suggest that you choose a SUNBEAMsystem solar panel to get the most out of the available space. Then secondly you could also consider if you need the 10% extra as well.
If you have unlimited space it might sometimes be cheaper to choose an inexpensive controller and buy several panels or a single larger panel.
CHOOSE AMONG MPPT CONTROLLERS
Most Yacht & Motorhome owners have limited space for solar panels and might choose an MPPT controller to optimized the limited amount of solar panels.
When choosing an MPPT it is important to weigh in that many modern solar panels (including SUNBEAMsystem’s) will give the best total output over a normal day if connected in parallel. On top of this, the probability of solar panel breakdown increases if connected in series (This is because out of necessity a by-pass diode will have to be added when putting solar panels in series and this introduces a higher probability of breakdown).
However, most MPPT controllers are optimized for 2 or 3 or even 4 solar panels in series. Remember that this will both lessen the performance of the solar panels AND will increase the probability of a breakdown. On top of this most yacht or motorhome owners do not have the space to fit that amount of solar panels. This gives you a catch-22 moment in your choice – any way you turn your back, you end up with a non-optimized system.
The solution is to choose a controller that gives the best output at about 17-23V on the solar panel (PV) side. Consider a MoonRay controller.
DO THE CHARGER NEED A HIGHER THAN NORMAL VOLTAGE
Many controllers and especially MPPT controllers (which might have more power-consuming electronics) do sometimes need an extra-high voltage on the solar panel(PV) side before they turn on the charging. It is not unusual that some controllers will only turn on the charge when the panel voltage has risen more than 5V above battery voltage (this might be expressed as “Vbat + 5Vâ€).
Example: The earlier mentioned controller will turn on when the solar panel side is 5 volts higher than the battery side. Let’s say we have a voltage on the battery side which is 12.5V then the solar charging will start when the solar panels reach 17.5V In reality this means that there most often will be a delay until the sunshine gets more intense before the charger turns on. Depending on the solar angle, partial shadowing, and of course the weather this might mean that the solar charge controller is turned off more than necessary.
MoonRay and especially Genasun charge controllers do not require any extra panel voltage at all.
FIND THE CONTROLLER SIZE
SUNBEAMsystem MoonRay are marked with the maximum amount of solar panels that can be connected to the controller. Either 160W or 320W in total.
A conventional solar charge controller will offer the size given in Ampere. Simplified this would translate for a 12V system into
10A -> 120W Max PV
20A -> 240W Max PV
40A -> 480W Max PV
(for 24V battery system, double the wattage).
Example: You purchase two 80W solar panels, which sum up to 160W.
Most controllers will turn off completely if the PV side passes the max limit. Rendering a zero output result. This makes it important to choose a controller of the correct size. MoonRay offers advanced power tuning by spilling excess power as heat and will not turn off during minor overpowering. Genasun does also allows for a slight amount of overpowering.
FOR BIG SIZE SOLAR PANEL INSTALLATIONS USE MULTIPLE CONTROLLERS.
Genasun and Moonray are not available in very big sizes. At first impression, one might question this but the simple answer is that the most efficient solar panel installation is that with one MPPT controller connected to a group of panels with exactly the same specifications and environmental conditions. In other words, even though you have two exactly identical solar panels when one of them is partially shadowed the MPPT will find a completely different optimization point. Rendering the optimal solution to have one MPPT controller each for these solar panels.
For a big size installation on a yacht and motorhome, the probability is big that one part of the solar panels will experience a completely different optimization point than the others. If one utilizes multiple controllers and group panels that more than often experience the same solar angle, temperature, and shadowing this system will be superior.
For any user that requires networking and data information using several controllers, it might feel like a hurdle for the information gathering. However, thanks to SUNBEAMsystem Multi Connect you will be able to virtually display all controller as one (or group them as one prefers)
MPPT CONVERSION EFFICIENCY
The competitive user might notice that many MPPT regulators might have a spike in the conversion rate. Most often many controllers perform exceptionally in a narrow power range and quite bad when higher or lower than this. Even if you choose the right amount of solar panels to match this spike of the Power output will naturally vary over the day because of the variations in weather. This means a controller might be extremely efficient in the lab but during a normal day, it will work mostly in a power range where it is not as efficient.
The solution is to choose a controller with a flat efficiency curve. This flat curve should be as close to 100% as possible from minimal to max power.
MoonRay controllers have a very decent flat and efficient curve all over.
TYPE OF BATTERIES
Most regulators are suitable for Sealed Lead Acid batteries. If you have Gel or AGM type you need to make sure that your controller could be set to charge this type of battery. The same goes for any type of mains charger. If you have Lithium batteries you need to take extra care in choosing the controller because the old type of lithium batteries needs special programs. SUNBEAMsystem SMART LITHIUM is the exception and does not need any special program.
WILL THE SOLAR CHARGE CONTROLLER INTERFERE WITH OTHER CHARGING EQUIPMENT?
The controller takes care of everything automatically and you can keep the old mains charger and generator/alternator. They will not interfere in a bad manner and you can enjoy a carefree charge of your batteries.
ADVANCED: 24 VOLT SYSTEMS
If you got a 24V system, most controllers will sense this automatically. – The only difference is that two panels (of the same model) need to be connected in series (connect the panels plus to minus and use the “leftover cables†to connect to the regulator )
It is of the utmost importance that if you connect solar panels in series you need to have one diode per solar panel. This diode should be connected according to careful instructions.
We do always recommend that you choose a Boost-regulator manufactured by Genasun. This will enable the use of a single solar panel on a 24V system (or solar panels connected in parallel).
WINTER STORAGE
Up north in the northern hemisphere, you probably end up with some sort of winter storage. A lead-acid battery requires a float charge to be kept fresh and a solar panel is the perfect solution also in the winter. As long as there is direct solar light reaching the solar panel. IF you choose a controller with a higher self-consumption this should be disconnected to not drain the battery. MoonRay controllers have a very decent flat and efficient curve all over.